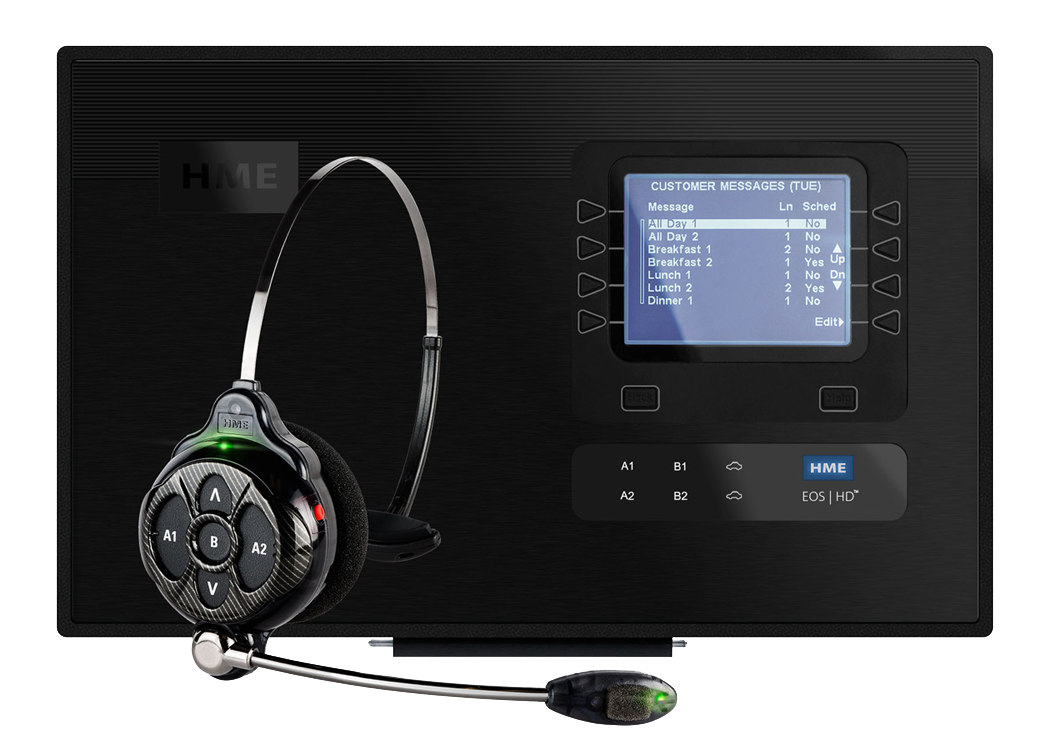
HME EOS system
Programming a Headset to your base
To program a new or recently repaired headset to your HME EOS base click the video or follow theses steps
1. If your screen on your base is not lit up press the back button if the screen is lit up press triangle button next to the Menu Button in the lower left corner.
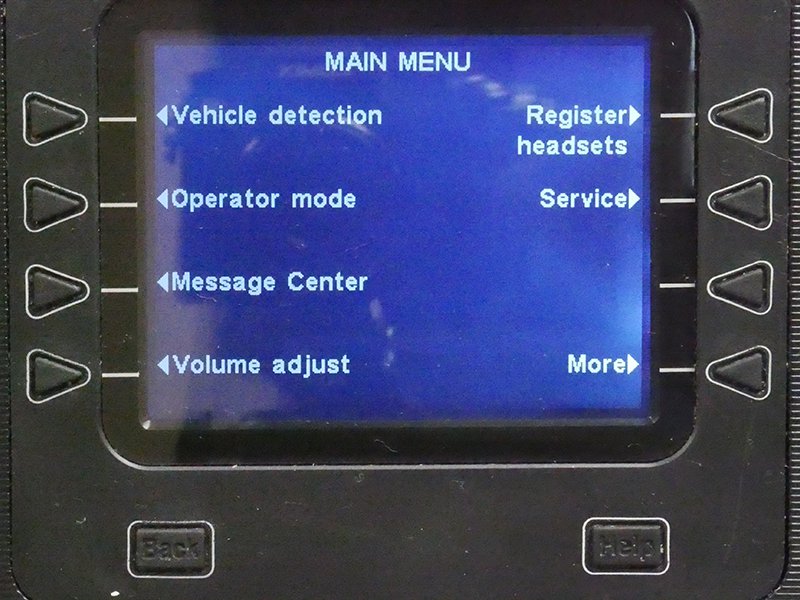
2. You should be looking at the main menu screen. Now press the triangle on the top right that says Register Headsets
3. Now the top of the screen should say Register Headsets. Press the triangle in the bottom right that says Register Headsets
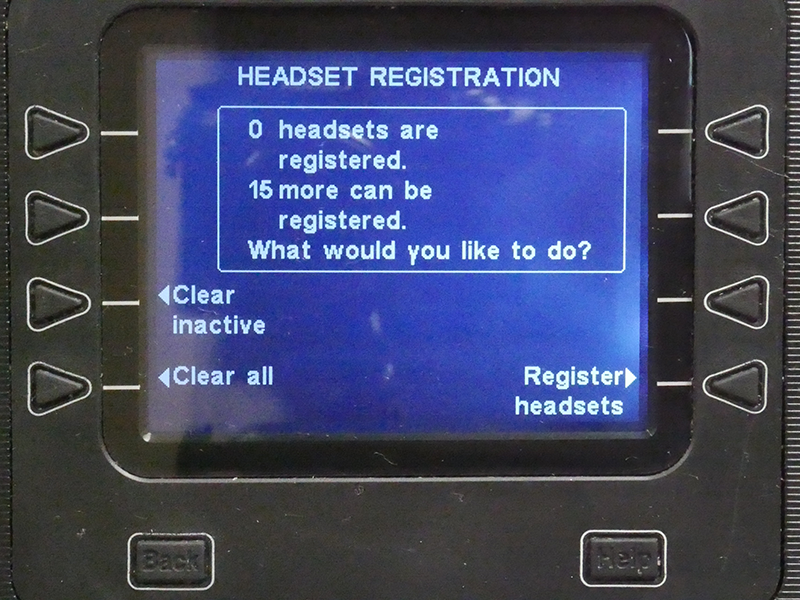
4. If you need to program more than one headset press the triangle next to Register Multi if you only need to register one press the Register Single
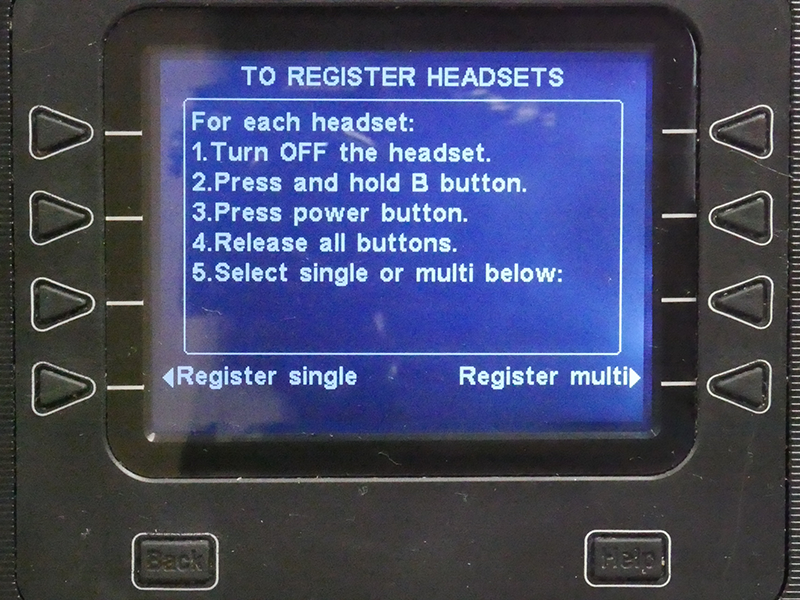
5. On the headset that needs to be registered with the power already off, press and hold the B button and press and release thePower button The headset should start flashing red, then flash green, and finally go to a solid green. Now your headset is fully operational.
Clearing the registry on your HME Base
To clear your HME EOS base registry so you can add new headsets click the video or follow these steps.
With the HME EOS system it is important to know that the base can only hold a total of 15 headsets at one time. Every time you register a communicator to your base you will be taking up one of the fifteen registrations. To clear out your registry you will need to
1. Make sure that all of the headsets at your store are turned on then press the Menu button in the lower left hand corner.
2.Now you should be looking at the main menu screen. Now press the triangle on the top right that says Register Headsets
3. The square on the screen will tell you how many communicators you have registered to you base and how many more you can register. Press the Clear Inactive button
4.Now the screen will be telling you that this will clear all headsets that are not turned on. Press the Clear Inactive button. A prompt on the screen will tell you that the inactive headsets have been cleared from your base. You will now be able to register more headsets to your base
Volume adjustment
To adjust the volume on your HME Eos system click the video or follow these steps
1. If your screen on your base is not lit up press the Back if the screen is lit up press the triangle button next to the Menu button in the lower left corner
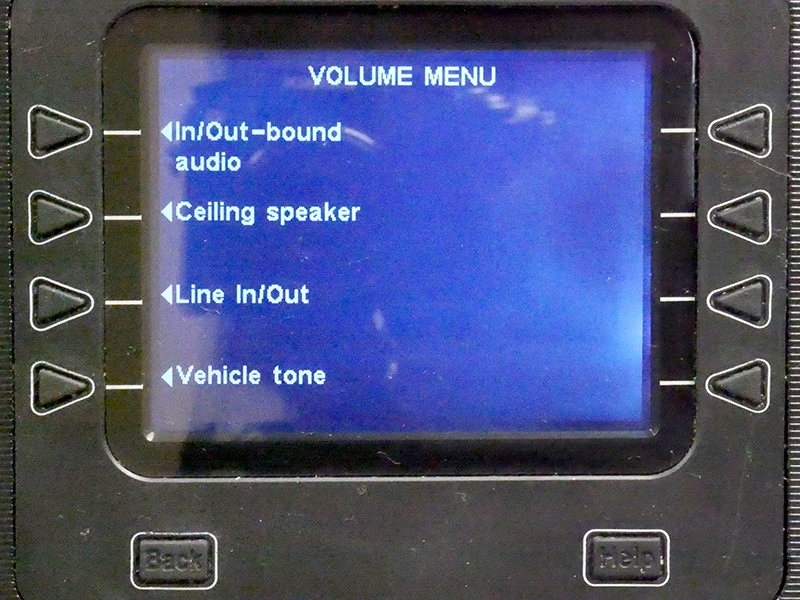
2. Now you should be looking at Main menu screen. Now press the triangle button on the lower left that says Volume adjust
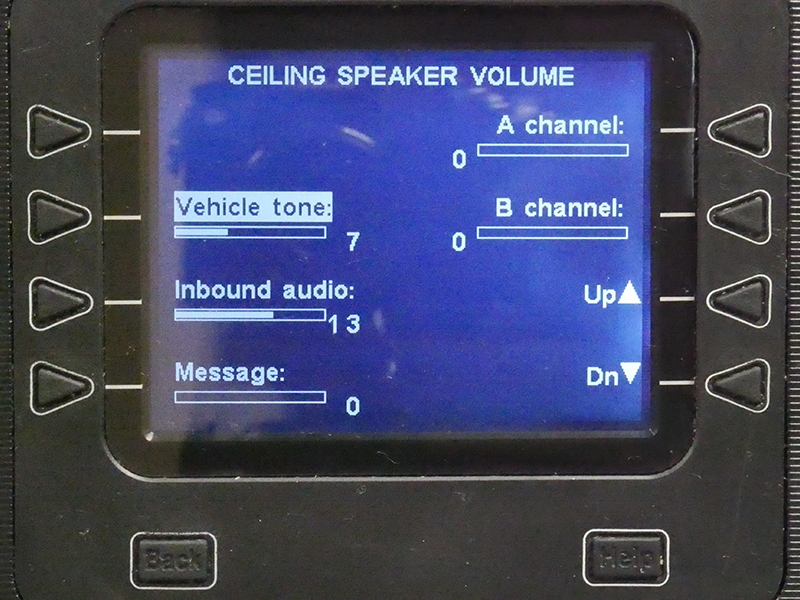
3.Now you should be looking at the Volume Menu. To change the speaker post volume levels press the In/Outbound Volume audio if you need to adjust your grill speaker volume press the Ceiling Speaker button.
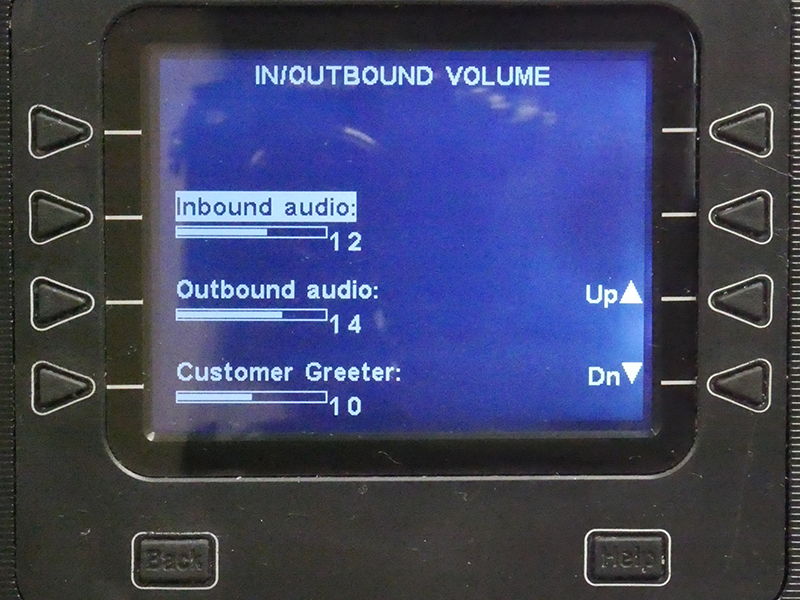
4. Using the triangle buttons select what you want to adjust and use the bottom right buttons to adjust the Volume up.
Outbound Volume is what the customer hears when you talk to them. Inbound volume is what you hear when the customer talks to you. One thing to keep in mind is that volume adjustment is a balancing act. If you turn up your outbound you will have feedback in your headsets, or you might overload your speaker
Performing a Hard Reset
If you are getting static in your headsets or feed back in your headsets you may need to do what is called a hard reset. Basically what this does is pull all the power from your base. To do this you will simply need to do the following steps.
1. Find your base on the wall. On the top of your base there will be two push tabs that allow the base to open up like a clam shell.
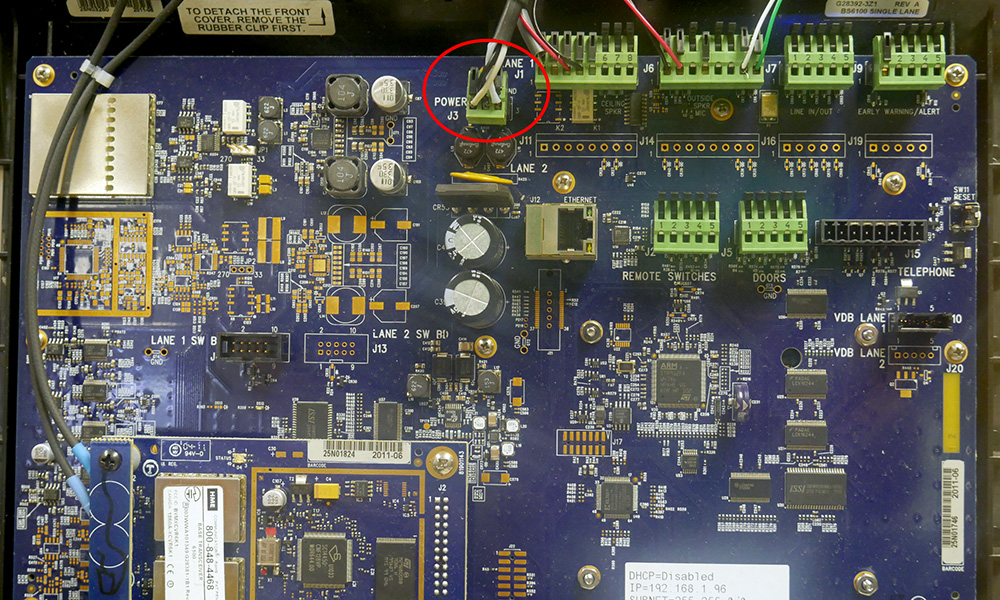
2. On the bottom half that swung down towards the top right you will see a series of green connectors with wires in them in a row. Below that and to the left you will a green connector that is marked in red in the picture below with 3 wires going into it. Typically the wires will be black, white, and clear wires on the board it will say "J3 power" Pull the green connector by the green connector do not pull on the wires. Once you have pulled the connector out wait a total of 15 seconds before plugging it back in.
3. Turn all of your headsets off and back on
If you continue to have issues call CSI of Oklahoma for more support
"A" Hands Free Mode
By default, this setting is ON for the A1 and the A2 (for lane 2). Press the A1 or A2 button once to talk at the menu. The headsets automatically disconnects when the customer drives away, or press the A1 and the A2 button to manually disconnect. To turn this mode on or off follow these steps.
To turn ON With the headset power off, simultaneously press and hold the B button and the UP arrow Once the power is on release the B and Up.
To turn OFF With the headset power OFF, simultaneously press and hold the B button and the Down arrow while you press the Power button. Once the power is on release the B and the Down arrow.
A voice prompt in the headset will say "Headset #, Battery full/half/low, A Hands Free On/Off, Lane #."
"B" Hands Free
By default, this setting is Off for the B button. Press the B button once to communicate with other headsets, remaining hands-free to perform other tasks. Press the B button to disconnect.
To turn ON WIth the headset power off, simultaneously press and hold the B button and A2 then press the Power button. Once the power is on release the B and A2.
To turn OFF With the headset power Off Press and hold the B button and the A2 and then press the Power Button Once the power is on, release B and A2.
A voice prompt in the headset will say "Headset #, Battery Full/Half/Low, B Hands Free On/Off, Lane #".
Auto Hands Free
By default, this setting is OFF. Auto Hands Free mode provides automatic headset connection between the Order taker and the customer when the vehicle arrives at the menu. The headset will automatically disconect when the customer drives away. ONLY TWO HEADSETS MAY BE CONFIGURED IN AUTO HANDS FREE MODE (ONE HEADSET EXCLUSIVILY FOR LANE 1 AND THE OTHER FOR LANE 2)
To turn ON With the headset powered off, press and hold the A1 button(For Lane 1) or A2 button (For Lane 2) and the UP ARROW and then press the Power button. Once the power is on, release A1 or A2 and UP ARROW.
To turn OFF Simply turn the hedset power off then back ON
A voice prompt in the headset will say "Headset #, Battery Full/half/Empty, Auto Hands Free, Lane # On/Off,
Note: Auto Hands free will Not be saved when the headset is powered off.
Push to Talk
By default, this setting is Off. Press and hold the A Button to connect and speak to a customer. Release the A button to disconnect from the customer. To turn Push to Talk on/off follow these steps.
To Turn ON withthe headset power Off, simultaneously press and hold the B Button and the DOWN Arrow and then press the Power Button. Once the power is on, release the B button and the DOWN Arrow.
To turn OFFWith the Headset power Off, simultaneously press and hold the B button and the UP Arrow While you press the Power Button. Once the power is on, release the B button and the Up Arrow.
Language Selection
The headset supports English, and Spanish languages. To configure the headset to a language other than English, press and hold the A1 button and the Down Arrow to toggle between the languages. Once you've made a selection, press the Power button to configure the headset to that language.
Change Date
To change the date on your base follow these simple steps.
1. If your screen on your base is not lit up press the Back button to make the screen light up. Press Menu button on the lower left of the screen as shown below.
2. You will now see the Main Menu, as shown in the picture below. Now press the Lower right option that says More.
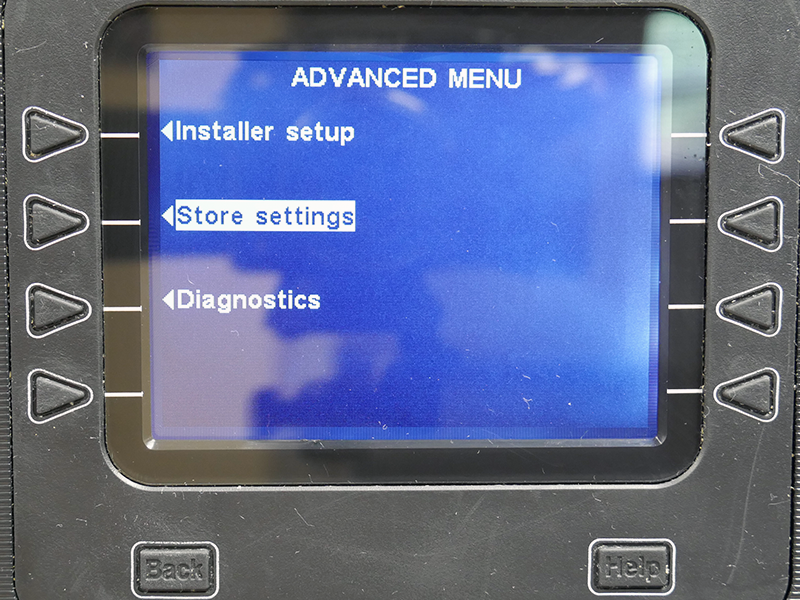
3. Now at the top of the screen it should say Advance Menu as show in the picture below. press the Store Settings button
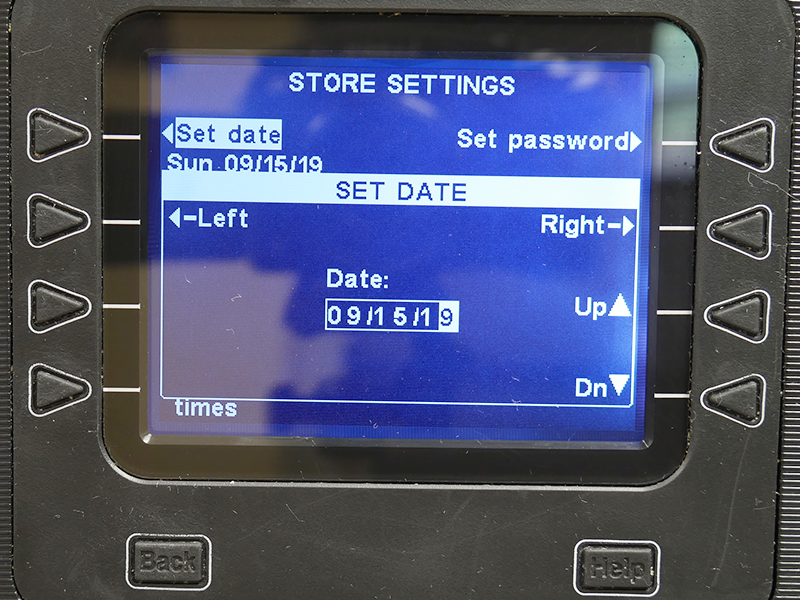
4. Now you will see the Store Settings at the top as shown in the picture below. To change time on your base press the Set Date button

5. Now you should see the Set Date on the screen. In the picture below you can see how the 9 in 19 is white. Use the Left and right arrow keys to move the selection and the up and down keys to change the selection. Once you have the date correct just press the back button until you see the main screen again.
If you are having difficulties changing the date on your HME base call CSI of Oklahoma at 877-266-1785
Changing the Time
To change your store time follow the following steps. This is important to have right if your store uses an automatic greeter if the time is not set correctly the base will tell the customer that the store is closed when it is not.
1. If your screen on your base is not lit up press the Back button to make the screen light up. Press Menu button on the lower left of the screen as shown below.
2. You will now see the Main Menu, as shown in the picture below. Now press the Lower right option that says More.
3. Now at the top of the screen it should say Advance Menu as show in the picture below. press the Store Settings button
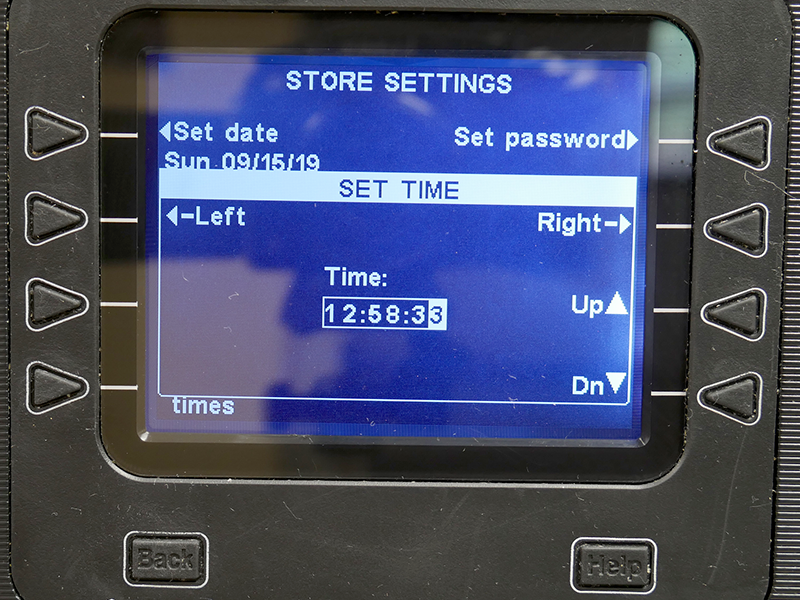
4. Now you will see the Store Settings at the top as shown in the picture below. To change time on your base press the Set Time button
5.If you notice on the picture below. The 3 is outlined in white. The Left and right buttons change the location of the white box. The Up and Down arrows change the number in the white box.
Once you have the time set press the Back button until you see the main screen. If you are having difficutlies chaging the time on your base.